Last week John and I fought a bloody Civil War encounter. It was an opportunity to use my growing ECW armies and inject a bit of painting enthusiasm that had been flagging for a couple of weeks. I personally blame the weather but I think its probably more to do with wanting to simply complete the armies.
Loving the underdog I naturally took the Royalists while John was in command of a slightly larger Parliamentarian army. I fielded Rupert's command of Elite cavalry with the great man himself leading them. So in an effort to balance things up the roundheads had two units of dragoons, some firelocks and two extra infantry regiments. I think I was being a bit too generous.
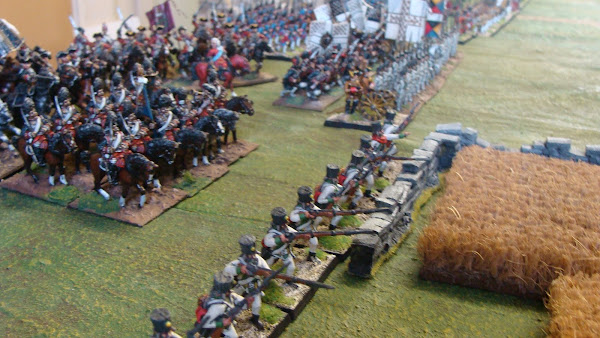
Rupert's Command, three regiments of 'Rupert's Charge' sculpted by the great man himself. Eventually there will be four such units.
We opted to use Pike and Shotte as our rules which are perfect for the ECW. In the command dice off I managed to make the King a mere 7 which is as much good as a chocolate fireguard, naturally Cromwell 'jinked' a 9 command throw! So nothing new there. Luckily my sub commanders were of a decent quality and of course I had 'Rupert who imbibed his men with a extra fighting abilities.
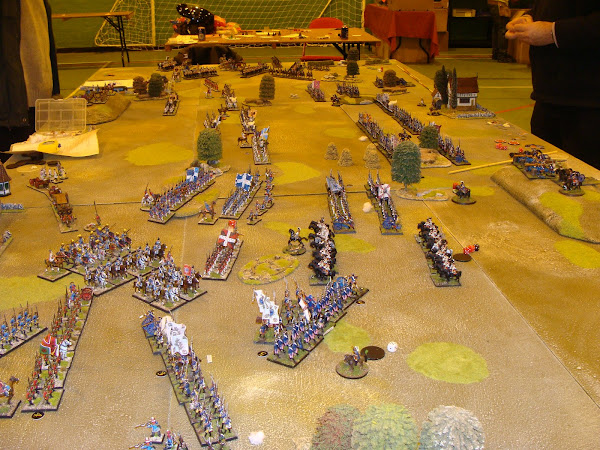
I setup a river to dissect the battlefield which gave a full move penalty should any units cross anywhere but by the two bridges.
The Parliamentarian heavy cavalry including the 'lobsters' who all suffer the inability to counter charge but pack a punch if they charge first.
My left wing cavalry of lesser gentlemen who didn't show much appetite for the conflict sadly.
My best Royalist infantry led by Rupert's regiment of foote and including the Duke of York's own regiment.
The King, looking confused and hesitant, his pensioners not helping his indecision.
The right wing of the battlefield was poor ground for cavalry so I opted to place Rupert's command in the centre to react to any Parliamentarian threat. I anchored my army on the right wing, fully intending to use my better quality cavalry to turn John's right flank whilst also attacking in the centre to keep his infantry engaged.
The one thing about using Pike and Shotte is that events can change very quickly and one needs to be on their guard or the battle can quickly slip away from them.Sound familiar?
John threw his own left wing against my infantry who were facing annoying skirmish fire from the dragoons who had quickly deployed off their nags.
Due to a steady attritional fire from the dragoons, the king was sent? to help steady things and rally some of the causalities. To be honest it initially worked,
Unfortunately the King couldnt rally every one of the units and after a charge which did drive away the dragoons, the right wing command began to unravel due to incessant firepower.
In the centre my advance after initially doing well began to stall. I did manage to capture the windmill which proved handy for my forlorn hope who caused a steady amount of causalities before they became shaken and were driven off.
The left wing pushed forwards simply because the Parliamentarian cavalry refused to advance to support Haselrige's Lobsters who were routed. Unfortunately the royalist victors piled after them and were simply destroyed, a product of their impetuosity.
Historically the Royalist infantry were always 'light' as regards firepower and tended to rely on push of pike. Pike and Shotte caters for this by giving the Parliamentarians an extra dice when firing but allowing the Royalists extra melee dice. Strangely I found it didnt affect the battle and my musketeers were effective and the pikes less so.
My best infantry brigade pressed the Parliamentarians who clung to any terrain they could find.Their blue regiment was able to stay in the cornfield even though it was eventually to be shaken and disordered. One will also notice that my artillery piece has been left behind. I managed to do my usual and throw a 'blunder' which caused the piece to retire. It took an age to re deploy.
Hard pressed, John brought every musket he had to bear upon my attack, which did halt my anticipated infantry charge.
It did however open up a great opportunity for Rupert who had taken his brigade across to help the left wing. I couldnt resist the target and ordered a 'follow me' to take the enemy in its flank. Brilliant.. One would think, especially once the cavalry had routed the infantry regiment they could press on and drive into the remaining units. So wrong...
The perceived target simply ran without being contacted forcing my cavalry to be left in no mans land and very vulnerable to enemy fire. One move later the lifeguard was a spent force and Rupert was too far away to rally causalities from the remaining regiments of his brigade by leading the charge across the river!
Things did seem to be going better for my infantry as the Duke's regiment routed Essex's regiment [orange] and then hit the flank of those damned blue coats who also routed after a real struggle.
Not stopping there I did another 'follow me' which allowed the Duke's regiment to hit the flank of Brooke's regiment [purple] who refused to rout and managed to 'shake' the gallant red coats.
In a final desperate throw of the dice I sent in my last decent regiment to drive another persistent Parliamentarian regiment from another cornfield. Shaken but defiant they held on! and managed to shake my gallant troops in turn.
The Parliamentarian left wing cavalry had finally moved into action and began to turn my flank whilst my right wing had simply disappeared as it retreated off the table
The Royalist collapse came suddenly as four of my five brigade's all became shaken in what was the penultimate move. Somehow Parliament had hung on and outlasted the Royalists who had fought to exhaustion.What a game, so close to a bloody victory. Maybe next time.
As a game it had been hugely enjoyable with potential victory snatched away by some persistent and immovable Parliamentarian infantry who simply wouldn't run away.My dice had been decent for a change and I had managed to save a lot of the hits inflicted on my troops. Luck however is a flighty beast and it eventually ran out.
I managed to complete a couple of extra units, these a troop of Royalist cavalry using the new Games Workshop Contrast inks.
And these, a dismounted regiment of Parliamentarian dragoons. Waller's London regiment. Mini figs to a man.


A splendid looking and sounding tussle there Robbie. As a staunch, or perhaps just stout, Parliamentarian I naturally enjoyed reading about the final outcome. “Death to Kings!” Even the 28mm ones!😉
ReplyDeleteI might have known David. You teachers, rebels to a man, or woman, of gender fluid etc,etc.....
DeleteFamtastic looking game and great to see the collection on the table top
ReplyDeleteThanks Neil, hopefully the next battle will use all my table.
DeleteEnjoyed your account, table and figures immensely. The windmill is something of a centre piece,very nice.
ReplyDeleteThanks Norm. The windmill is a lovely model. Pricey yes but great. Check out Tabletop World.
DeleteSpectacular battle, Robbie! I think you nearly scored a victory in this one. Really splendid to see your recent additions to your growing ECW collection out on the gaming table. Your glossy, Old School figures look super on the table. Well done!
ReplyDeleteThanks Jonathan, to be honest I thought my armies were 'cutting edge', I never viewed them as that old school. Just joking.
DeleteFantastic!
ReplyDeleteThanks Steve,
DeleteI think my lack of proper planning regarding the actual size of my armies caught me out. I seem to have bought lots of metal and then simply set to painting them.Somehow the ECW has taken up a lot of time.
Looks great. Love the whole look and feel of the game.
ReplyDeleteThanks Paul, hopefully we will meet up at Newark.
DeleteGreat looking game Robbie.
ReplyDeleteYou seem to be taking your Defeats with good grace.
A thing I just cannot do !!!!
Thanks Brian, if you beat a dog enough times they start to actually like it. Oh oh, it sounds like Ive been having too many Chinese meals.
DeleteVery nice indeed Robbie, I'm quite jealous!
ReplyDeleteDave.
No need to be jealous Dave, youve got some wonderful armies.
DeleteNice looking wargame.
ReplyDeleteThanks Jim, brights lights etc etc.
DeleteRobbie,grand looking game,beautiful terrain and decently painted figures(just kidding!).You seem to have what I have-BDTS-Bad Dice Throwing Syndrome,when it matters most!
ReplyDeletejohnc
John I couldnt win an argument sometimes but one has to keep trying or buy some dodgy dice to throw. Now thats an idea.
Delete